Quantum Autoencoder with MNIST classification
What’s a quantum autoencoder and why should you care?
Quantum autoencoders are awesome but you may be wondering what’s even a normal autoencoder and what benefits come from it. To answer this we must give a brief overview of classical autoencoders. In the deep learning field it is common to see/use huge neural networks (a neural network it’s just a set of interconnected neurons) to achive a goal (classify images, generate images, create music, etc..). But what if we could achive the same goal with fewer neurons? That would be awesome. Well, we can achive that by using an autoencoder. That is to generate a smaller neural network while getting the same results approximately.
Now, a quantum autoencoder applies the same principle of a classical autoencoder but instead of applying the process to neurons we apply the process to a statevector. So informally, a quantum state autoencoder is a circuit that takes a statevector as input and it outputs a reduced version of that statevector. And to get the original statevector (approximately) from the encoded statevector we can apply the opposite of a QAE, that is, a Quantum state decoder. This is a great idea because as you might know we don’t get access to a lot of resources in NISQ machines so by applying a QAE we can reduce the use of those resources.
Graphically, a quantum state autoencoder and decoder can be seen as the following:

As you can see in the image, we have a \(4\times4\) statevector that we want to encode into a \(2\times2\) statevector. We can do this by applying the autoencoder to our circuit. One thing worth noticing is that two qubits were set to 0 state in the process. Nonetheless, there wasn’t a loss of information because we encoded that information inside the two last qubits. Now, if we want to have the original \(4 \times 4\) statevector we need to apply the decoder to our circuit. Notice that we have to include the qubits that were set in the 0 state.
The general process to construct a quantum autoencoder is [1] [6]:
- Generate a statevector that we want to reduce.
- Create an anzast for a set of parameters (this is represented in the image as the AUTOENCODER).
- Create the decoder by finding the inverse of the AUTOENCODER anzast.
- Get the cost of the AUTOENCODER by comparing the original state with the restored state from the DECODER.
- Optimize the parameters by using a classical optimization routine (ADAM, ADA, Stochastic gradient descent, etc..).
Objectives
Now that we saw what is and why autoencoders matter we propose in the following post how to construct one, step by step. And even further, We are going to apply it to a variational circuit that classifies images to show the capabilities of a quantum autoencoder. So the contents of this post are:
- First, we present the statevector creation that we want to reduce.
- Secondly, We present how to build a quantum autoencoder.
- Then, We present the decoder circuit.
- After that, We present how to optimize the circuits and see the results of this optimization process.
- Then, We present the quantum classifier and the results from a classification.
- Finally, we make some conclusions and present the list of references.
Contruction of a quantum autoencoder
Below are the necessary imports for this project:
import numpy as np
# Quiskit libraries
from qiskit import QuantumCircuit, transpile, Aer, IBMQ, execute, QuantumRegister, ClassicalRegister
from qiskit.tools.jupyter import *
from qiskit.visualization import *
from qiskit.circuit import Parameter, ParameterVector

#MNIST set libraries for the acquisition and pre-processing data.
import tensorflow as tf

#Graph libraries
import matplotlib.pyplot as plt
import seaborn as sns
sns.set_theme()
Statevector generation
We initialize the data for our quantum circuit; using Tensorflow since it already has the MNIST dataset.
Each set has ten classes representing integer values from 0 to 9. For this project, we will only classify 0 and 1, so we filter them. And given that pixel values go from 0 to 255, we normalize them to get [0,1].
#Loading the MNIST set divided by a train set and a test set
(x_train, y_train), (x_test, y_test) = tf.keras.datasets.mnist.load_data()

# Rescale the images from [0,255] to the [0.0,1.0] range.
x_train, x_test = x_train[..., np.newaxis]/255.0, x_test[..., np.newaxis]/255.0

#Showing the length of the train and test sets
print("Number of images in the training set:", len(x_train))
print("Number of images in the test set:", len(x_test))
#Function to filter the 0 and 1 labels of the MNIST set
'''
Input = x_label and y_label sets
Output = x_label and y_label sets filtered
'''
def filter_01(x, y):
    keep = (y == 0) | (y == 1)
    x, y = x[keep], y[keep]
    return x,y
x_train, y_train = filter_01(x_train, y_train) #Filter the train set
x_test, y_test = filter_01(x_test, y_test) #Filter the test set

#Showing the length of the train and test sets after filtering the data
print("Number of images in the training set:", len(x_train))
print("Number of images in the test set:", len(x_test))
Number of images in the training set: 12665
Number of images in the test set: 2115
Below there is an image with the original size 28x28 px
#Plotting the first element of the train set
plt.imshow(x_train[0, :, :, 0])
plt.colorbar()
<matplotlib.colorbar.Colorbar at 0x1db303d3040>
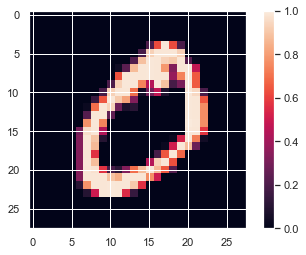
Image resizing
Tensorflow has the function tf.image.resize that decreases the images by the following possible methods:
- bilinear: Bilinear interpolation. If antialias is true, becomes a hat/tent filter function with radius 1 when downsampling.
- lanczos3: Lanczos kernel with radius 3. High-quality practical filter but may have some ringing, especially on synthetic images.
- lanczos5: Lanczos kernel with radius 5. Very-high-quality filter but may have stronger ringing.
- bicubic: Cubic interpolant of Keys. Equivalent to Catmull-Rom kernel. Reasonably good quality and faster than Lanczos3Kernel, particularly when upsampling.
- gaussian: Gaussian kernel with radius 3, sigma = 1.5 / 3.0.
- nearest: Nearest neighbor interpolation. antialias has no effect when used with nearest neighbor interpolation.
- area: Anti-aliased resampling with area interpolation. antialias has no effect when used with area interpolation; it always anti-aliases.
- mitchellcubic: Mitchell-Netravali Cubic non-interpolating filter. For synthetic images (especially those lacking proper prefiltering), less ringing than Keys cubic kernel but less sharp.
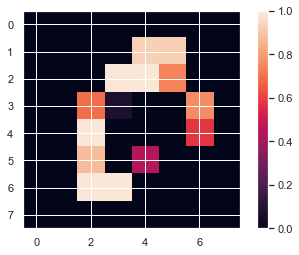
We use the method nearest, resizing the image from 28x28px to 8x8px.
#resizing the image from 28x28 to 8x8 by the nearest method
x_train_small = tf.image.resize(x_train, (8,8), method='nearest', preserve_aspect_ratio=True).numpy()
x_test_small = tf.image.resize(x_test, (8,8), method='nearest', preserve_aspect_ratio=True).numpy()
We tranform our images into an amplitude state.
#Plotting the first element of the train set after the resizing
plt.imshow(x_train_small[0,:,:,0], vmin=0, vmax=1)
plt.colorbar()
<matplotlib.colorbar.Colorbar at 0x1db305a4b80>
#Reshaping the train and test test to a 64x1 matriz
x_train = x_train_small.reshape(len(x_train_small), 64)
x_test = x_test_small.reshape(len(x_test_small), 64)
x_train.shape,x_test.shape
((12665, 64), (2115, 64))
#Showing the first element of the train set
x_train_small[0]
array([[[0.        ],
        [0.        ],
        [0.        ],
        [0.        ],
        [0.        ],
        [0.        ],
        [0.        ],
        [0.        ]],

       [[0.        ],
        [0.        ],
        [0.        ],
        [0.        ],
        [0.93333333],
        [0.92941176],
        [0.        ],
        [0.        ]],

       [[0.        ],
        [0.        ],
        [0.        ],
        [0.98823529],
        [0.99215686],
        [0.74117647],
        [0.        ],
        [0.        ]],

       [[0.        ],
        [0.        ],
        [0.69803922],
        [0.0745098 ],
        [0.        ],
        [0.        ],
        [0.76470588],
        [0.        ]],

       [[0.        ],
        [0.        ],
        [0.98823529],
        [0.        ],
        [0.        ],
        [0.        ],
        [0.58039216],
        [0.        ]],

       [[0.        ],
        [0.        ],
        [0.88235294],
        [0.        ],
        [0.44705882],
        [0.        ],
        [0.        ],
        [0.        ]],

       [[0.        ],
        [0.        ],
        [0.98823529],
        [0.98823529],
        [0.        ],
        [0.        ],
        [0.        ],
        [0.        ]],

       [[0.        ],
        [0.        ],
        [0.        ],
        [0.        ],
        [0.        ],
        [0.        ],
        [0.        ],
        [0.        ]]])
Transforming into qubits
Since the limited equipment (CPU) and its capabilities, it’s not possible to use all images of the MNIST dataset. That’s why we will experiment with the following eight options:
- The first 5 images of the training set.
- The first 10 images of the training set.
- The first 12 images of the training set.
- The first 50 images of the training set.
- The first 70 images of the training set.
- The first 100 images of the training set.
- The first 200 images of the training set.
- The first 500 images of the training set.
x_train = (x_train)
x_test = (x_test)

x_train.shape,x_test.shape
((12665, 64), (2115, 64))
We convert the 8x8 matrix of each image into a 64x1 vector.
#Showing the first element of the train set
x_train[0]
array([0.        , 0.        , 0.        , 0.        , 0.        ,
       0.        , 0.        , 0.        , 0.        , 0.        ,
       0.        , 0.        , 0.93333333, 0.92941176, 0.        ,
       0.        , 0.        , 0.        , 0.        , 0.98823529,
       0.99215686, 0.74117647, 0.        , 0.        , 0.        ,
       0.        , 0.69803922, 0.0745098 , 0.        , 0.        ,
       0.76470588, 0.        , 0.        , 0.        , 0.98823529,
       0.        , 0.        , 0.        , 0.58039216, 0.        ,
       0.        , 0.        , 0.88235294, 0.        , 0.44705882,
       0.        , 0.        , 0.        , 0.        , 0.        ,
       0.98823529, 0.98823529, 0.        , 0.        , 0.        ,
       0.        , 0.        , 0.        , 0.        , 0.        ,
       0.        , 0.        , 0.        , 0.        ])
Images that have no valuable information for the training set, i.e. zero vectors, are deleted.
#Deleting no valuable information for the training set
k = 0 c

while k < len(x_train):
    a = x_train[k].copy() #make a copy of the actual element
    #Verfify if it has some valuable data
    if np.sum(a) == 0.:
        #If not has valuable data
        print(k,x_train[k])
        x_train = np.delete(x_train, k, axis=0) #Delete the actual element from the x_label
        y_train = np.delete(y_train, k, axis=0) #Delete the actual element from the y_label
        k -= 1 #Take back one value of the counter to match the new set length
    k+=1
Images that have no valuable information for the test set, i.e. zero vectors, are deleted.
#Deleting no valuable information for the test set
k = 0

while k < len(x_test): #Deleting no valuable information for the training set
    a = x_test[k].copy()
    #Verfify if it has some valuable data
    if np.sum(a) == 0.:
        #If not has valuable data
        print(k,x_test[k])
        x_test = np.delete(x_test, k, axis=0) #Delete the actual element from the x_label
        y_test = np.delete(y_test, k, axis=0) #Delete the actual element from the y_label
        k -= 1 #Take back one value of the counter to match the new set length
    k+=1
Now, we renormalize so we can interpret a vector state and then apply it to our quantum circuit model according to the next mathematical expression:
\(\frac{input-vector}{\sqrt{\sum_{i=0}^{n-1} (input-vector_i)^2}}\), Where input-vector is the 64x1 vector that we’ll tranform into a vector state \(| \psi \rangle\).
import cmath
#Funtion to normalize the data of an array
'''
Input = Array with n values
Output = Array with normalized valued
'''
def Normalize(row):
    #We calculate the squareroot of the sum of the square values of the row
    suma = np.sqrt(np.sum(row**2))
    if suma == 0.:
        #If the sum is zero we return a 0
        return 0.0
    #Else we divide each value between the sum value above
    row = row/suma
    return row

#Normalize the training set data
for i in range(len(x_train)):
    x_train[i] = Normalize(x_train[i])

#Normalize the test set data
for i in range(len(x_test)):
    x_test[i] = Normalize(x_test[i])

#Showing the state sum of the training set
print("The sum of the states from the training set 0",np.sum(x_train[0]**2))
The sum of the states from the training set 0 1.0
Construction of the Autoencoder
For this part 6 qubits are considered, since 64 = \(2^6\). We’ll map with the amplitude method, and just with 1 layer.
Later on, the circuit used for this application will be shown.
n=6 #Number of qubits
num_layers = 1 #Number of layers
#Making a ndarray of floats based on the number of layers
params = np.random.random(10*(num_layers))
It’s verified that the input vector with index zero is normalized to a state vector.
#Showing the normalized values of the first element of the training set
x_train[0]
array([0.        , 0.        , 0.        , 0.        , 0.        ,
       0.        , 0.        , 0.        , 0.        , 0.        ,
       0.        , 0.        , 0.30173661, 0.30046881, 0.        ,
       0.        , 0.        , 0.        , 0.        , 0.31948582,
       0.32075362, 0.23961437, 0.        , 0.        , 0.        ,
       0.        , 0.22566856, 0.02408822, 0.        , 0.        ,
       0.24722117, 0.        , 0.        , 0.        , 0.31948582,
       0.        , 0.        , 0.        , 0.18763453, 0.        ,
       0.        , 0.        , 0.2852552 , 0.        , 0.1445293 ,
       0.        , 0.        , 0.        , 0.        , 0.        ,
       0.31948582, 0.31948582, 0.        , 0.        , 0.        ,
       0.        , 0.        , 0.        , 0.        , 0.        ,
       0.        , 0.        , 0.        , 0.        ])
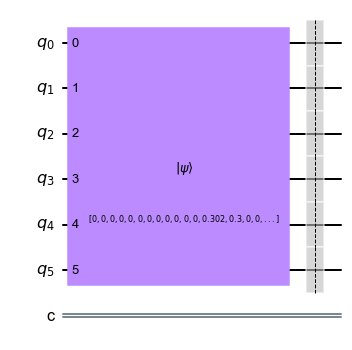
By entering the state vector as input to the initialize(vectorstate,qubits) function/method, we obtain a 6-qubit quantum circuit.
An observation of this function is that the computational cost may vary depending on the method generated, especially if 0 amplitude states predominate.
#Function to create a quantum circuit based on the number of qubit and a
#vector of complex amplitudes to initialize to
'''
Input: Number of qubits, vector of complex amplitudes
Output: Quantum Circuit
'''
def input_data(n,inputs):
    circuit = QuantumCircuit(n,1) #create the quantum circuit with n qubits
    #initialization of the circuit with the vector of amplitudes
    circuit.initialize(inputs,range(0,n,1))
    circuit.barrier() #Draw a barrier
    return circuit

#Example of a quantum circuit with the first row of te trainig set
input_data(n,x_train[0]).draw(output="mpl")
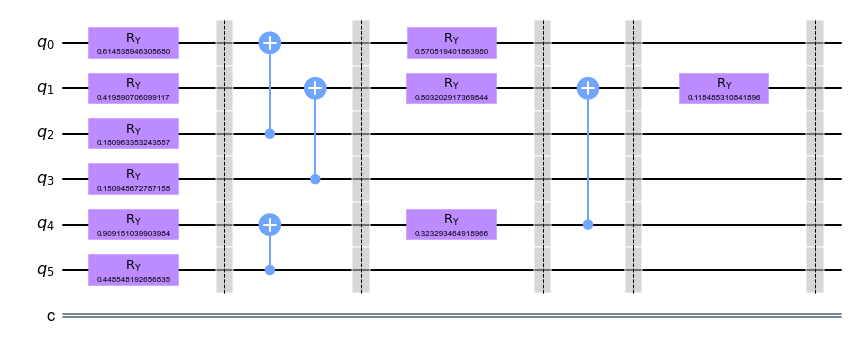
In this step we created the quantum variational circuit that represents the quantum autoencoder. We considered as reference the quantum circuit proposed in [1], but some problems arose due to the computational cost, so we also considered [2], [3], [4], [5] to generate our own.
#Function to create a quantum variational circuit
'''
Input: number of qubits, number of layers, parameters to initialized the circuit
Output: Quantum Circuit
'''
def vqc(n, num_layers,params):
    #Set the number of layers and qubits
    #ParameterVectors are initialized with a string identifier and an integer specifying the vector length
    parameters = ParameterVector('θ', 10*(num_layers))
    len_p = len(parameters)
    circuit = QuantumCircuit(n, 1) #create the quantum circuit with n qubits


    #Creating the circuit for each layer
    for layer in range(num_layers):
        #Applying a ry gate in each qubit
        for i in range(n):
            #the rotation of the ry gate is defined in the parameters list
            #based on the layer
            circuit.ry(parameters[(layer)+i], i)
        circuit.barrier() #Create a barrier

        circuit.cx(2,0) #Apply a CNOT gate between the qubit 2 and 0
        circuit.cx(3,1) #Apply a CNOT gate between the qubit 3 and 1
        circuit.cx(5,4) #Apply a CNOT gate between the qubit 5 and 4
        circuit.barrier() #Create a barrier

        #Apply a RY gate in the qubit 0 with the rotation specified in the parameter list
        circuit.ry(parameters[6+(layer)],0)
        #Apply a RY gate in the qubit 1 with the rotation specified in the parameter list
        circuit.ry(parameters[7+(layer)],1)
        #Apply a RY gate in the qubit 4 with the rotation specified in the parameter list
        circuit.ry(parameters[8+(layer)],4)
        circuit.barrier() #Create a barrier

        circuit.cx(4,1) #Apply a CNOT gate between the qubit 4 and 1
        circuit.barrier() #Create a barrier

        #Apply a RY gate in the qubit 1 with the rotation specified in the parameter list
        circuit.ry(parameters[9+(layer)], 1)
        circuit.barrier() #Create a barrier


    #Creating a parameters dictionary
    params_dict = {}
    i = 0
    for p in parameters:
        #The name of the value will be the string identifier and an integer specifying the vector length
        params_dict[p] = params[i]
        i += 1
    #Assign parameters using the assign_parameters method
    circuit = circuit.assign_parameters(parameters = params_dict)
    return circuit
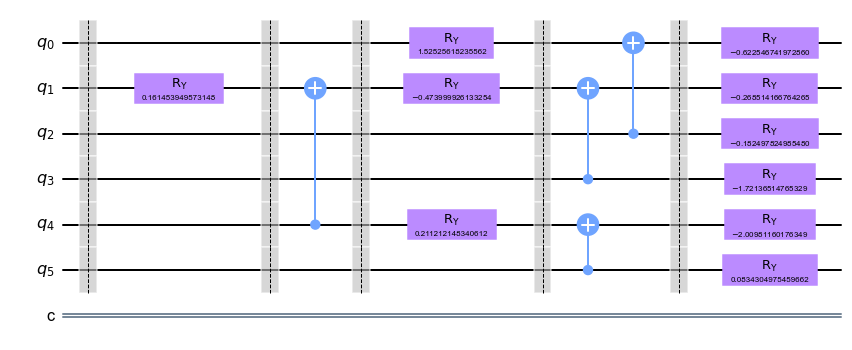
The circuit of our tensor network is affected by 10 q-gates \(Ry(\theta)\) and 4 \(C_{not}\). Considering the cost as linked to the number of \(C_{not}\), it will be 4.
#An example with 6 quibits, one layer and 10 parameters
vqc(n,num_layers,params).draw(output="mpl")
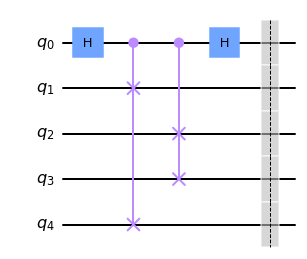
From [6] we considered the Swap-test to seek the value of y. Adittionally, we took the general idea of the swap test from [7] which is the following:
| Given two states $$ | \phi_0 \phi_1 \rangle\(, where the first one is the reference vector\) | 0 \rangle\(and the second one is state that we want to eliminate (with the autoencoder) to use a smaller number of qubits. If we apply the swap-test and after the measurement of the state\) | 0 \rangle\(we get the\) | 0 \rangle$$ state then we correctly encoded our qubits. |
#Fucntion to make a swap test
'''
Input: Number of qubits
Output: Quantum circuit
'''
def swap_test(n):
    qubits_values = 2*n+1 #Create a new qubit value to create our circuit
    qc = QuantumCircuit(qubits_values) #Create the quantum circuit with the qubits value
    qc.h(0) #Applying a H gate to the first qubit
    for i in range(n):
        #Applying a cswap gate between the first quibit and the i+1 and 2*n-i qubits
        qc.cswap(0,i+1,2*n-i)
    qc.h(0) #Applying a H gate to the first qubit
    qc.barrier() #Create a barrier
    return qc
#Example of a swap test with 2 quibits
swap_test(2).draw(output="mpl")
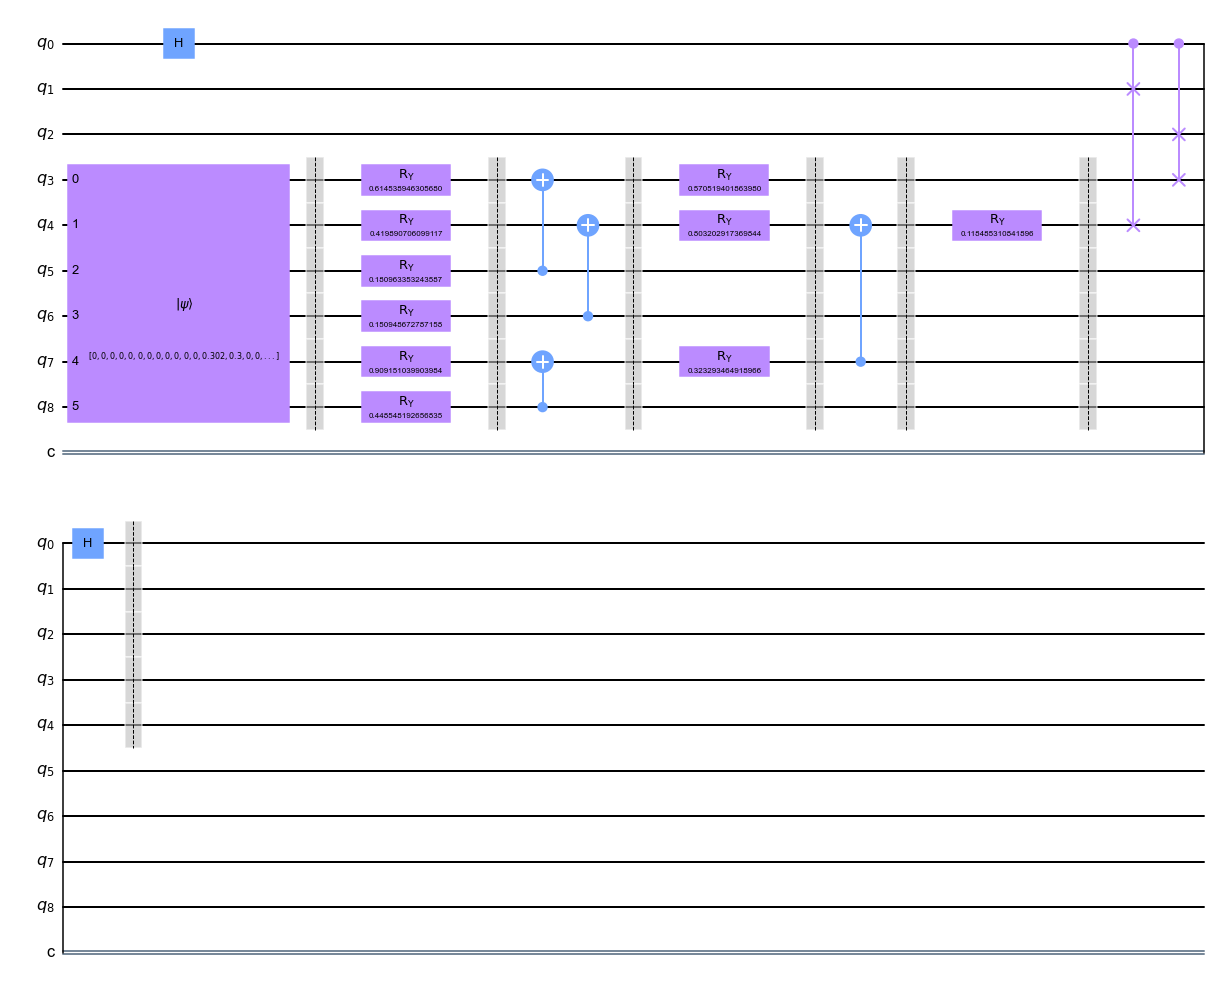
The following cell shows the circuit of the autoencoder to encode 6 qubits into 4 qubits.
size_reduce = 2 #Number of qubits we want to reduce
circuit_init = input_data(n,x_train[0]) #Create a inicial circuit
circuit_vqc = vqc(n,num_layers,params) #Create a quantum variational circuit
circuit_swap_test = swap_test(size_reduce) #Create a swap test circuit

#Create a new circuit based on the size of the initial circuit and the desired qubits to reduce
circuit_full = QuantumCircuit(n+size_reduce+1,1)

#Combine the initial circuit, the quantum variatinal circuit and the swap test
#For the initial circuit and QVC we start at the qubit size_reduce + 1
#For the swap test we start at the qubit 0
circuit_full = circuit_full.compose(circuit_init,[i for i in range(size_reduce+1,n+size_reduce+1)])
circuit_full = circuit_full.compose(circuit_vqc,[i for i in range(size_reduce+1,n+size_reduce+1)])
circuit_full = circuit_full.compose(circuit_swap_test,[i for i in range(2*size_reduce+1)])
circuit_full.draw(output="mpl")
Quantum autoencoder inverse
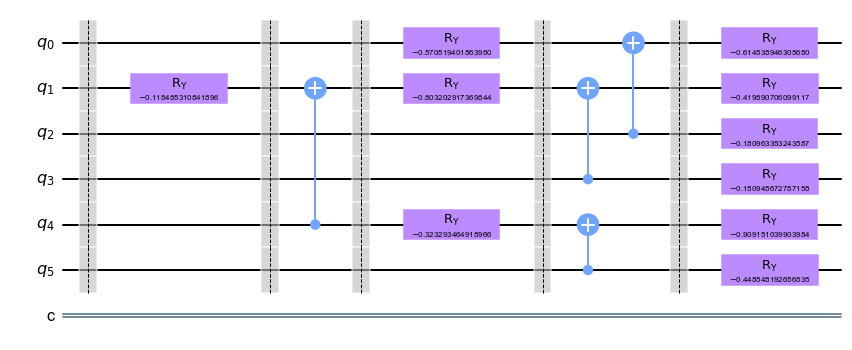
Qiskit has an autoinverse function which generates the inverse of a circuit. We can use this function to generate the inverse of our variational circuit.
#We generate the inverse of the QVC
vqc(n,num_layers,params).inverse().draw(output = "mpl")
Optimization
Now that we know how to construct a quantum autoencoder and it’s inverse we have to optimize the circuit. To do that, we are going to show how to optimize the variational circuit and after that we’ll see how well we did it we the help of a few metrics. We decided to use scikitlearn optimizers instead of qiskit’s because we couldn’t find a way to use it with an amplitude map. We also used the shuffle method to use some different images in each iteration of the optimizer to get better results.
from random import shuffle
from scipy.optimize import minimize
Now, to identify the cost we used the expected value of the z axis. This is defined by:
\[\langle Z \rangle = \langle q | Z | q\rangle =\langle q|0\rangle\langle 0|q\rangle - \langle q|1\rangle\langle 1|q\rangle =|\langle 0 |q\rangle|^2 - |\langle 1 | q\rangle|^2\]And after integrating the swap-test criteria we get:
\[1 -\langle Z \rangle = 1 - \langle q | Z | q\rangle = 1- [\langle q|0\rangle\langle 0|q\rangle - \langle q|1\rangle\langle 1|q\rangle] = 1 - [|\langle 0 |q\rangle|^2 - |\langle 1 | q\rangle|^2] = 1 - |\langle 0 |q\rangle|^2 + |\langle 1 | q\rangle|^2\]You can check this link for additional information on the expected value: https://qiskit.org/textbook/ch-labs/Lab02_QuantumMeasurement.html
#Function to identify a function cost
'''
Input: An array of parameters(vector of complex amplitudes)
Output: Function cost
'''
def objective_function(params):
    costo = 0
    shuffle(x_train) #reorganize the order of the train set items
    lenght= 5 #We only will consider the first five elements of the taining set
    #For each item of the trainig set
    for i in range(lenght):

        circuit_init = input_data(n,x_train[i])#Create a inicial circuit
        circuit_vqc = vqc(n,num_layers,params) #Create a quantum variational circuit
        circuit_swap_test = swap_test(size_reduce) #Create a swap test circuit

        #Create a new circuit based on the size of the initial circuit and the desired qubits to reduce
        circuit_full = QuantumCircuit(n+size_reduce+1,1)

        #Combine the initial circuit, the quantum variatinal circuit and the swap test
        #For the initial circuit and QVC we start at the qubit size_reduce + 1
        #For the swap test we start at the qubit 0
        circuit_full = circuit_full.compose(circuit_init,[i for i in range(size_reduce+1,n+size_reduce+1)])
        circuit_full = circuit_full.compose(circuit_vqc,[i for i in range(size_reduce+1,n+size_reduce+1)])
        circuit_full = circuit_full.compose(circuit_swap_test,[i for i in range(2*size_reduce+1)])
        circuit_full.measure(0, 0) #Measure the first qubit
        #qc.draw()
        shots= 8192 #Number of shots
        #Execute the circuit in the qasm_simulator
        job = execute( circuit_full, Aer.get_backend('qasm_simulator'),shots=shots )
        counts = job.result().get_counts() #Count the results of the execution
        probs = {} #Calculate the probabilities of 0 and 1 state
        for output in ['0','1']:
            if output in counts:
                probs[output] = counts[output]/shots #Calculate the average of a state
            else:
                probs[output] = 0
        costo += (1 +probs['1'] -  probs['0']) #Update the actual function cost

    return costo/lenght

for i in range(1):
    #Minimization of the objective_fucntion by a COBYLA method
    minimum = minimize(objective_function, params, method='COBYLA', tol=1e-6)
    params = minimum.x #Get the solution array
    #Show the cost of the solution array
    print(" cost: ",objective_function(params))
    print(params)
 cost:  0.2796875
[ 0.62254674  0.26851417  0.18249782  1.72136515  2.0098116  -0.0834305
 -1.52525618  0.47399993 -0.21121215 -0.16145395]
When we finish the iterations of the optimizer, if we apply the complex conjugate of the state vector we should get the original information according to [6] and [7]. This proccess is applied to the test set and the training set.
#Function to compress the test set values
'''
Input: An array of parameters(vector of complex amplitudes)
Output: Array with compress values
'''
def compress_result_test(params):
    reduce = [] #List to save the compress values
    #For each row in the test set we will
    for i in range(len(x_test)):

        circuit_init = input_data(n,x_test[i]) #Create a inicial circuit
        circuit_vqc = vqc(n,num_layers,params) #Create a quantum variational circuit

        #Create a new circuit based on the size of the initial circuit and the desired qubits to reduce
        circuit_full = QuantumCircuit(n,n-size_reduce)

        #Combine the initial circuit, the quantum variatinal circuit
        circuit_full = circuit_full.compose(circuit_init,[i for i in range(n)])
        circuit_full = circuit_full.compose(circuit_vqc,[i for i in range(n)])
        len_cf = len(circuit_full) #Known the length of the circuit
        #For each n - the the desired qubits to reduce we will
        for i in range(n-size_reduce):
            circuit_full.measure(size_reduce+i, i) #Measure the circuit in the position size_reduce+i
        #We will execute the full circuit in the qasm simulator
        job = execute( circuit_full, Aer.get_backend('qasm_simulator'),shots=8192 )
        result = job.result().get_counts() #Get the results of the execution
        #Get the probabilities of each state
        probs = {k: np.sqrt(v / 8192) for k, v in result.items()}
        reduce.append(probs) #Save the probabilities

    return reduce

#Call the compress_result_test function with the parameters defined above
reduce_img =compress_result_test(params)
test_reduce = [] #List to save the new values of the image reduction
#for each value in the reduce_img list
for i in reduce_img:
    index_image = [] #List to save the reduction values
    #We now take in count we want a 4X4 image
    for j in range(16):
        bin_index = bin(j)[2:] #We take the binary value of j from the 2 position to the end
        while len(bin_index) <4: #While bin_index is less than 4
            bin_index = '0'+bin_index #We concatenate a 0 string at the beginnig
        try:
            #We try to save the element of the row in the position bin_index
            index_image.append(i[bin_index])
        except:
            index_image.append(0) #If we can't, we only save a 0

    #We save the new imagen values in the test_recuce list
    test_reduce.append(np.array(index_image))
#Function to compress the training set values
'''
Input: An array of parameters(vector of complex amplitudes)
Output: Array with compress values
'''
def compress_result_train(params):
    reduce = [] #List to save the compress values
    #For each row in the training set we will
    for i in range(len(x_train)):
        circuit_init = input_data(n,x_train[i]) #Create a inicial circuit
        circuit_vqc = vqc(n,num_layers,params) #Create a quantum variational circuit

        #Create a new circuit based on the size of the initial circuit and the desired qubits to reduce
        circuit_full = QuantumCircuit(n,n-size_reduce)

        #Combine the initial circuit, the quantum variatinal circuit
        circuit_full = circuit_full.compose(circuit_init,[i for i in range(n)])
        circuit_full = circuit_full.compose(circuit_vqc,[i for i in range(n)])
        len_cf = len(circuit_full) #Known the length of the circuit
        #For each n - the the desired qubits to reduce we will
        for i in range(n-size_reduce):
            circuit_full.measure(size_reduce+i, i) #Measure the circuit in the position size_reduce+i
        #We will execute the full circuit in the qasm simulator
        job = execute( circuit_full, Aer.get_backend('qasm_simulator'),shots=8192 )
        result = job.result().get_counts() #Get the results of the execution
        #Get the probabilities of each state
        probs = {k: np.sqrt(v / 8192) for k, v in result.items()}
        reduce.append(probs) #Save the probabilities

    return reduce

#Call the compress_result_train function with the parameters defined above
reduce_img =compress_result_train(params)
train_reduce = [] #List to save the new values of the image reduction
#for each value in the reduce_img list
for i in reduce_img:
    index_image = [] #List to save the reduction values
    #We now take in count we want a 4X4 image
    for j in range(16):
        bin_index = bin(j)[2:] #We take the binary value of j from the 2 position to the end
        while len(bin_index) <4: #While bin_index is less than 4
            bin_index = '0'+bin_index #We concatenate a 0 string at the beginnig
        try:
            #We try to save the element of the row in the position bin_index
            index_image.append(i[bin_index])
        except:
            index_image.append(0) #If we can't, we only save a 0

    #We save the new imagen values in the train_recuce list
    train_reduce.append(np.array(index_image))
In the next cell we can appreciate the first 5 images of the test set which we reduced from a 8x8 size to 4x4 size.
plt.figure()

#subplot(r,c) provide the no. of rows and columns
f, axarr = plt.subplots(5,1)

# use the created array to output your multiple images. In this case I have stacked 4 images vertically
axarr[0].imshow(x_test[0].reshape(8,8)*255)
axarr[1].imshow(x_test[1].reshape(8,8)*255)
axarr[2].imshow(x_test[2].reshape(8,8)*255)
axarr[3].imshow(x_test[3].reshape(8,8)*255)
axarr[4].imshow(x_test[4].reshape(8,8)*255)
<matplotlib.image.AxesImage at 0x1db360c24c0>


<Figure size 432x288 with 0 Axes>

#subplot(r,c) provide the no. of rows and columns
f, axarr = plt.subplots(5,1)

# use the created array to output your multiple images. In this case I have stacked 4 images vertically
axarr[0].imshow(test_reduce[0].reshape(4,4)*255)
axarr[1].imshow(test_reduce[1].reshape(4,4)*255)
axarr[2].imshow(test_reduce[2].reshape(4,4)*255)
axarr[3].imshow(test_reduce[3].reshape(4,4)*255)
axarr[4].imshow(test_reduce[4].reshape(4,4)*255)
<matplotlib.image.AxesImage at 0x1db36449ee0>

Data decompression
| After applying the complex conjugate, as we state earlier, we should get the orignal input value $$ | \phi \rangle$$ |
#We generate the inverse of the QVC
vqc(n,num_layers,params).inverse().draw(output = "mpl")
#Function to decode the test set values compressed
'''
Input: An array of parameters(vector of complex amplitudes)
Output: Array with decode values
'''

def decoder_result_test(params):
    reduce = [] #List to save the decoded values
    #For each row in the test set reduced we will
    for i in range(len(test_reduce)):

        #Create a initial circuit with 6 qubits and a list of 48 zeros and the i row of the test reduced values
        circuit_init = input_data(6,np.concatenate((np.zeros(48), test_reduce[i]), axis=0))
        #Create the inverse VQC
        circuit_vqc = vqc(n,num_layers,params).inverse()

        #Create a new circuit to combine the inicial circuit and the VQC
        circuit_full = QuantumCircuit(n,n)

        #Combine the initial circuit, the quantum variatinal circuit
        circuit_full = circuit_full.compose(circuit_init,[i for i in range(n)])
        circuit_full = circuit_full.compose(circuit_vqc,[i for i in range(n)])
        #We will execute the full circuit in the qasm simulator
        job = execute( circuit_full, Aer.get_backend('statevector_simulator') )
        result = job.result().get_statevector() #Get the results of the execution
        reduce.append(result) #Save the results
    return reduce

#Call the decoder_result_test function
decoder =decoder_result_test(params)
plt.figure()

#subplot(r,c) provide the no. of rows and columns
f, axarr = plt.subplots(5,1)

# use the created array to output your multiple images. In this case I have stacked 4 images vertically
axarr[0].imshow(decoder[0].real.reshape(8,8)*255)
axarr[1].imshow(decoder[1].real.reshape(8,8)*255)
axarr[2].imshow(decoder[2].real.reshape(8,8)*255)
axarr[3].imshow(decoder[3].real.reshape(8,8)*255)
axarr[4].imshow(decoder[4].real.reshape(8,8)*255)
<matplotlib.image.AxesImage at 0x1db334b5100>


<Figure size 432x288 with 0 Axes>

#Function to decode the training set values compressed
'''
Input: An array of parameters(vector of complex amplitudes)
Output: Array with decode values
'''
def decoder_result_train(params):
    reduce = [] #List to save the decoded values
    #For each row in the test set reduced we will
    for i in range(len(train_reduce)):
        #Create a initial circuit with 6 qubits and a list of 48 zeros and the i row of the test reduced values
        circuit_init = input_data(n,np.concatenate((np.zeros(48), train_reduce[i]), axis=0))
        #Create the inverse VQC
        circuit_vqc = vqc(n,num_layers,params).inverse()

        #Create a new circuit to combine the inicial circuit and the VQC
        circuit_full = QuantumCircuit(n,n)

        #Combine the initial circuit, the quantum variatinal circuit
        circuit_full = circuit_full.compose(circuit_init,[i for i in range(n)])
        circuit_full = circuit_full.compose(circuit_vqc,[i for i in range(n)])
        #We will execute the full circuit in the qasm simulator
        job = execute( circuit_full, Aer.get_backend('statevector_simulator') )
        result = job.result().get_statevector() #Get the results of the execution
        reduce.append(result) #Save the results
    return reduce

#Call the decoder_result_train function
decoder_train =decoder_result_train(params)
How well we did it?
To find out how well we optimize the variational circuit we need to know how to compare images.
To compare the reconstructed images obtained from the autoencoder and the original images we propose the following metrics:
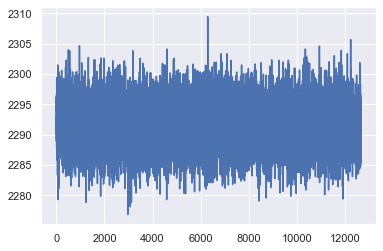
- Mean square error (MSE)
whre \(m\) is the image height \(I\), n the width of the image \(K\) and \(i\),\(j\) the psotions \(x,y\) images pixels; the closer to 0 get the better the result.
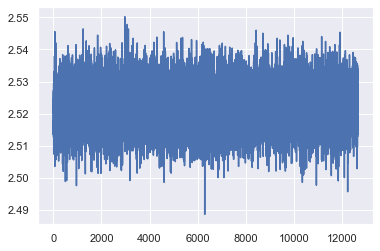
- Peak signal-to-noise ratio (PSNR)
where \(m\) is the image height \(I\), n the width of the image \(K\) and \(MSE\) the mean square error; the bigger the better.
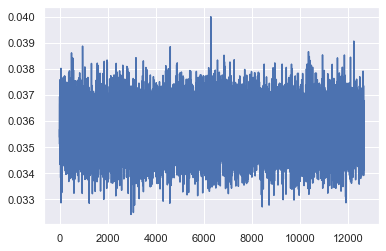
- structural similarity index measure (SSIM)
where \(\mu\) is the mean, \(\sigma\) is the standard deviation and \(c\) is covariance [1]; The worst case is -1 and the best is 1.
#Function to calculate Mean square error
'''
Input: 2 list with the images values
Output: the mean square error
'''
def mse(imageA, imageB):
    err = np.sum((imageA.astype("float") - imageB.astype("float")) ** 2)
    err /= float(imageA.shape[0] * imageA.shape[1])
    return err
from skimage.metrics import structural_similarity as ssim
Comparing the training set
In the next section we’ll see the results of the autoencoder using the different metrics that we previously described.
import math
ssim_list = [] #List to save the structural similarity index measure
mse_list = [] #List to save the Mean square error
psnr_list = [] #List to save the Peak signal-to-noise ratio

#For each row of the training set we will
for i in range(len(x_train)):
    #Reshape to a 8X8 image of the training set
    test_img = x_train[i].reshape(8,8)*255
    #Reshape to a 8X8 image of the decoded trainig set
    decoded_img = decoder_train[i].real.reshape(8,8)*255
    #Calculate the MSE between the reshaped decoded image and the trainig set image
    Y = float(mse(decoded_img,test_img))
    #Calculate the SSIM between the reshaped decoded image and the trainig set image
    ssim_list.append(ssim(decoded_img.astype("float"),test_img.astype("float")))
    mse_list.append(Y) #Save the MSE value
    aux = (64**2)/Y #Calculate the PSNR
    psnr_list.append(10*math.log10(aux)) #Save the PSRN value
#Plotting the MSE results of the training set
from matplotlib import pyplot as plt
plt.plot(mse_list)
plt.show()
#Plotting the PSNR results of the training set
from matplotlib import pyplot as plt
plt.plot(psnr_list)
plt.show()
#Plotting the SSIM results of the training set
from matplotlib import pyplot as plt
plt.plot(ssim_list)
plt.show()
Comparing the test set
We’ll do the same procedure to see the results of the autocoder with the test set.
ssim_list = [] #List to save the structural similarity index measure
mse_list = [] #List to save the Mean square error
psnr_list = [] #List to save the Peak signal-to-noise ratio

#For each row of the test set we will
for i in range(len(x_test)):
    #Reshape to a 8X8 image of the training set
    test_img = x_test[i].reshape(8,8)*255
    #Reshape to a 8X8 image of the decoded trainig set
    decoded_img = decoder[i].real.reshape(8,8)*255
    #Calculate the MSE between the reshaped decoded image and the test set image
    Y = float(mse(decoded_img,test_img))
    #Calculate the SSIM between the reshaped decoded image and the test set image
    ssim_list.append(ssim(decoded_img.astype("float"),test_img.astype("float")))
    mse_list.append(Y) #Save the MSE value
    aux = (64**2)/Y #Calculate the PSNR
    psnr_list.append(10*math.log10(aux)) #Save the PSRN value
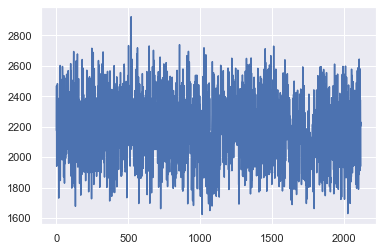
#Plotting the MSE results of the test set
from matplotlib import pyplot as plt
plt.plot(mse_list)
plt.show()
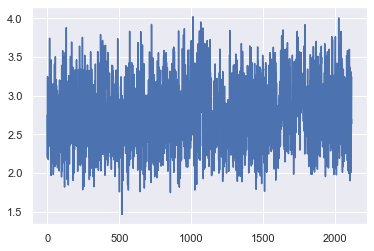
#Plotting the PSNR results of the test set
from matplotlib import pyplot as plt
plt.plot(psnr_list)
plt.show()
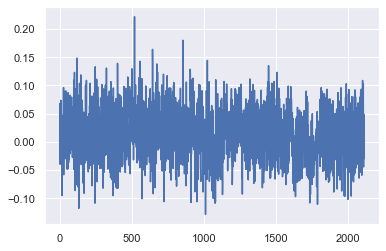
#Plotting the SSIM results of the test set
from matplotlib import pyplot as plt
plt.plot(ssim_list)
plt.show()
We repeat the same process but now with not random inputs and save the data at csv files which will use to do a classification with reduced images.
#Loading the MNIST set divided by a train set and a test set
(x_train_c, y_train_c), (x_test_c, y_test_c) = tf.keras.datasets.mnist.load_data()

# Rescale the images from [0,255] to the [0.0,1.0] range.
x_train_c, x_test_c = x_train_c[..., np.newaxis]/255.0, x_test_c[..., np.newaxis]/255.0
x_train_c, y_train_c = filter_01(x_train_c, y_train_c) #Filter the train set
x_test_c, y_test_c = filter_01(x_test_c, y_test_c) #Filter the test set
#resizing the images from 28x28 to 8x8 by the nearest method
x_train_c = tf.image.resize(x_train_c, (8,8), method='nearest', preserve_aspect_ratio=True).numpy()
x_test_c = tf.image.resize(x_test_c, (8,8), method='nearest', preserve_aspect_ratio=True).numpy()
#Normalize the training set data
for i in range(len(x_train_c)):
    x_train_c[i] = Normalize(x_train_c[i])

#Normalize the test set data
for i in range(len(x_test)):
    x_test_c[i] = Normalize(x_test_c[i])
#Reshaping the train and test test to a 64x1 matriz
x_train_c = x_train_c.reshape(len(x_train_small), 64)
x_test_c = x_test_c.reshape(len(x_test_small), 64)

x_train_c.shape
(12665, 64)
#Function to compress the training set values
'''
Input: An array of parameters(vector of complex amplitudes)
Output: Array with compress values
'''
def compress_result_train(params):
    reduce = [] #List to save the compress values
    #For each row in the training set we will
    for i in range(len(x_train_c)):
        circuit_init = input_data(n,x_train_c[i]) #Create a inicial circuit
        circuit_vqc = vqc(n,num_layers,params) #Create a quantum variational circuit

        #Create a new circuit based on the size of the initial circuit and the desired qubits to reduce
        circuit_full = QuantumCircuit(n,n-size_reduce)

        #Combine the initial circuit, the quantum variatinal circuit
        circuit_full = circuit_full.compose(circuit_init,[i for i in range(n)])
        circuit_full = circuit_full.compose(circuit_vqc,[i for i in range(n)])
        len_cf = len(circuit_full) #Known the length of the circuit
        #For each n - the the desired qubits to reduce we will
        for i in range(n-size_reduce):
            circuit_full.measure(size_reduce+i, i) #Measure the circuit in the position size_reduce+i
        #We will execute the full circuit in the qasm simulator
        job = execute( circuit_full, Aer.get_backend('qasm_simulator'),shots=8192 )
        result = job.result().get_counts() #Get the results of the execution
        #Get the probabilities of each state
        probs = {k: np.sqrt(v / 8192) for k, v in result.items()}
        reduce.append(probs) #Save the probabilities

    return reduce

#Call the compress_result_train function with the parameters defined above
reduce_train_c = compress_result_train(params)
#Function to compress the test set values
'''
Input: An array of parameters(vector of complex amplitudes)
Output: Array with compress values
'''
def compress_result_test(params):

    reduce = [] #List to save the compress values
    #For each row in the test set we will
    for i in range(len(x_test_c)):
        circuit_init = input_data(n,x_test_c[i]) #Create a inicial circuit
        circuit_vqc = vqc(n,num_layers,params) #Create a quantum variational circuit

        #Create a new circuit based on the size of the initial circuit and the desired qubits to reduce
        circuit_full = QuantumCircuit(n,n-size_reduce)

        #Combine the initial circuit, the quantum variatinal circuit
        circuit_full = circuit_full.compose(circuit_init,[i for i in range(n)])
        circuit_full = circuit_full.compose(circuit_vqc,[i for i in range(n)])
        len_cf = len(circuit_full) #Known the length of the circuit
        #For each n - the the desired qubits to reduce we will
        for i in range(n-size_reduce):
            circuit_full.measure(size_reduce+i, i) #Measure the circuit in the position size_reduce+i
        #We will execute the full circuit in the qasm simulator
        job = execute( circuit_full, Aer.get_backend('qasm_simulator'),shots=8192 )
        result = job.result().get_counts() #Get the results of the execution
        #Get the probabilities of each state
        probs = {k: np.sqrt(v / 8192) for k, v in result.items()}
        reduce.append(probs) #Save the probabilities

    return reduce

#Call the compress_result_test function with the parameters defined above
reduce_test_c = compress_result_test(params)
test_reduce = [] #List to save the new values of the image reduction
#for each value in the reduce_img list
for i in reduce_test_c:
    index_image = [] #List to save the reduction values
    #We now take in count we want a 4X4 image
    for j in range(16):
        bin_index = bin(j)[2:] #We take the binary value of j from the 2 position to the end
        while len(bin_index) <4: #While bin_index is less than 4
            bin_index = '0'+bin_index #We concatenate a 0 string at the beginnig
        try:
            #We try to save the element of the row in the position bin_index
            index_image.append(i[bin_index])
        except:
            index_image.append(0) #If we can't, we only save a 0

    #We save the new imagen values in the test_recuce list
    test_reduce.append(np.array(index_image))
train_reduce = [] #List to save the new values of the image reduction
#for each value in the reduce_img list
for i in reduce_train_c:
    index_image = [] #List to save the reduction values
    #We now take in count we want a 4X4 image
    for j in range(16):
        bin_index = bin(j)[2:] #We take the binary value of j from the 2 position to the end
        while len(bin_index) <4: #While bin_index is less than 4
            bin_index = '0'+bin_index #We concatenate a 0 string at the beginnig
        try:
            #We try to save the element of the row in the position bin_index
            index_image.append(i[bin_index])
        except:
            index_image.append(0) #If we can't, we only save a 0

    #We save the new imagen values in the train_recuce list
    train_reduce.append(np.array(index_image))
#Function to decode the training set values compressed
'''
Input: An array of parameters(vector of complex amplitudes)
Output: Array with decode values
'''
def decoder_result_train_c(params):
    reduce = [] #List to save the decoded values
    #For each row in the test set reduced we will
    for i in range(len(train_reduce)):
        #Create a initial circuit with 6 qubits and a list of 48 zeros and the i row of the test reduced values
        circuit_init = input_data(n,np.concatenate((np.zeros(48), train_reduce[i]), axis=0))
        circuit_vqc = vqc(n,num_layers,params).inverse() #Create the inverse VQC

        #Create a new circuit to combine the inicial circuit and the VQC
        circuit_full = QuantumCircuit(n,n)

        #Combine the initial circuit, the quantum variatinal circuit
        circuit_full = circuit_full.compose(circuit_init,[i for i in range(n)])
        circuit_full = circuit_full.compose(circuit_vqc,[i for i in range(n)])
        #We will execute the full circuit in the qasm simulator
        job = execute( circuit_full, Aer.get_backend('statevector_simulator') )
        result = job.result().get_statevector() #Get the results of the execution
        reduce.append(result) #Save the results
    return reduce

#Call the decoder_result_train function
decoder_train_c =decoder_result_train_c(params)
len(decoder_train_c) #Get the length of the decoder train list
12665
#Function to decode the test set values compressed
'''
Input: An array of parameters(vector of complex amplitudes)
Output: Array with decode values
'''
def decoder_result_test_c(params):
    reduce = [] #List to save the decoded values
    #For each row in the test set reduced we will
    for i in range(len(test_reduce)):

        #Create a initial circuit with 6 qubits and a list of 48 zeros and the i row of the test reduced values
        circuit_init = input_data(6,np.concatenate((np.zeros(48), test_reduce[i]), axis=0))
        #Create the inverse VQC
        circuit_vqc = vqc(n,num_layers,params).inverse()

        #Create a new circuit to combine the inicial circuit and the VQC
        circuit_full = QuantumCircuit(n,n)

        #Combine the initial circuit, the quantum variatinal circuit
        circuit_full = circuit_full.compose(circuit_init,[i for i in range(n)])
        circuit_full = circuit_full.compose(circuit_vqc,[i for i in range(n)])
        #We will execute the full circuit in the qasm simulator
        job = execute( circuit_full, Aer.get_backend('statevector_simulator') )
        result = job.result().get_statevector() #Get the results of the execution
        reduce.append(result) #Save the results
    return reduce

#Call the decoder_result_test function
decoder_c =decoder_result_test_c(params)
Save results
We save 2 csv files as train.csv and test.csv with the compressed images obtained from our autoencoder, the first to the training set and the second for the test set.
import pandas as pd


df = pd.DataFrame(train_reduce) #Dataframe for the training reduce set
df[16] = y_train #The class of each value is at the end of the dataframe
df.to_csv("train_1.csv",index=False) #Create the csv file with the results


df = pd.DataFrame(test_reduce) #Dataframe for the test reduce set
df[16] = y_test #The class of each value is at the end of the dataframe
df.to_csv("test_1.csv",index=False) #Create the csv file with the results
Results of our quantum autoencoder
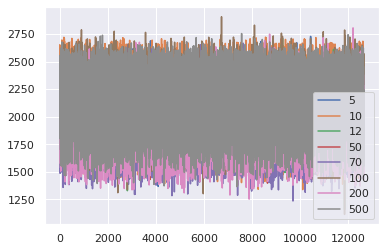
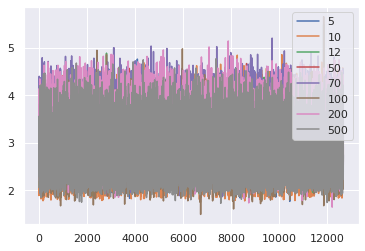
Due the results obtained we define an histogram by a metric in the best cases and we contruct the following graphs.
MSE
The results closer to 0 are the best results, looking at a visual approach, our best case is with 200 images.
PSNR
The results with the larger value than the axis, are the best results, looking at a visual approach, our best case is with 200 images.
SSIM
The results closer to 1 are the best results, looking at a visual approach, our best case is with 200 images.
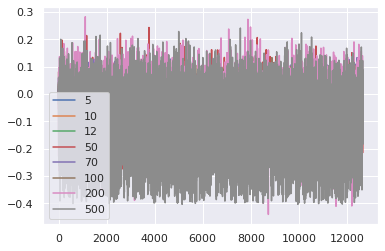
Therefore we consider the results obtained from 200 images to elaborate a binary classifier.
The binary classifier
Now well present how to construct the binary classifier that classifies the mnist dataset. First, We import the libraries we need to realized this work, using qiskit machine learning.
# Scikit Imports
from sklearn.svm import SVC
from sklearn.preprocessing import StandardScaler, MinMaxScaler

# Qiskit Imports
from qiskit import Aer, execute
from qiskit.circuit import QuantumCircuit, Parameter, ParameterVector
from qiskit.circuit.library import PauliFeatureMap, ZFeatureMap, ZZFeatureMap
from qiskit.circuit.library import TwoLocal, NLocal, RealAmplitudes, EfficientSU2
from qiskit.circuit.library import HGate, RXGate, RYGate, RZGate, CXGate, CRXGate, CRZGate
from qiskit_machine_learning.kernels import QuantumKernel

import tensorflow as tf
import numpy as np
import matplotlib.pyplot as plt
import csv
We get data from csv files to process this values in the quantum variational classifier, passing an input vector 16x1 and another to label.
sample_train = [] #List from the sample train
label_train = [] #List from the label train
with open('train.csv', newline='') as csvfile: #Open the csv file that we before create
    reader = csv.reader(csvfile, delimiter=',') #Reading the csv file and get the values by commas
    next(reader, None) #We ignore the header
    for row in reader: #We go for each row of the file
        sample_train.append(row[0:-1]) #The values of the samples are all except the last cell
        label_train.append(row[-1]) #The class of that row is the last cell
sample_train = np.array(sample_train).astype(np.float) #Convert the sample train to a numpy float array
label_train = np.array(label_train).astype(np.float) #Convert the label train to a numpy float array
sample_train.shape, label_train.shape #Show the shape of the arrays
((12665, 16), (12665,))
sample_test = [] #List from the sample test
label_test = [] #List from the label test
with open('test.csv', newline='') as csvfile: #Open the csv file that we before create
    reader = csv.reader(csvfile, delimiter=',') #Reading the csv file and get the values by commas
    next(reader, None) #We ignore the header
    for row in reader: #We go for each row of the file
        sample_test.append(row[0:-1]) #The values of the samples are all except the last cell
        label_test.append(row[-1]) #The class of that row is the last cell
sample_test = np.array(sample_test).astype(np.float) #Convert the sample test to a numpy float array
label_test = np.array(label_test).astype(np.float) #Convert the label test to a numpy float array
sample_test.shape, label_test.shape #Show the shape of the arrays
((2115, 16), (2115,))
We generate the input vector to the train set and the test set with dimensions 16x1.
sample_train = sample_train.reshape(len(sample_train), 16) #Reshape the sample train to a 16X1 array
sample_test = sample_test.reshape(len(sample_test), 16) #Reshape the sample test to a 16X1 array
We contruct the classifier using 4 qubits and due this, we need to decrease the number of tests on our devices, allowing to run the examples using Hold-out 70-30 method, i.e. 70% training and 30% test.
train_size = 700 #Number of samples of the training sample
sample_train = sample_train[:train_size] #Reduce the sample train
label_train = label_train[:train_size] #Reduce the label train

test_size = 300 #Number of samples of the test sample
sample_test = sample_test[:test_size] #Reduce the sample test
label_test = label_test[:test_size] #Reduce the label test
The next thing is to map the classical vector to a quantum state for this we will use the ZZFeatureMap function (“You can use another one like PauliFeatureMap or ZFeatureMap”).
Then we will initialize a quantum kernel from which we can calculate each element of this matrix in a quantum computer by calculating the transition amplitude. This provides us with an estimate of the kernel quantum matrix, which we can then use in a kernel machine learning algorithm, in this case it will be used in a vector support machine
#map the classical vector to a quantum state with the ZZFeatureMap, 16 qubits, 1 repetiton and a linear entanglement
zz_map = ZZFeatureMap(feature_dimension=16, reps=1, entanglement='linear', insert_barriers=True)
#Create the quantum kernel with the ZZFeatureMap
zz_kernel = QuantumKernel(feature_map=zz_map, quantum_instance=Aer.get_backend('statevector_simulator'))
#Show the ZZFeatureMap with 16 qubits
zz_map.draw(output="mpl")
We build the training and test matrices for the quantum kernel. For each pair of data points in the training data set
#We create the matrix_train with the sample train values
matrix_train = zz_kernel.evaluate(x_vec=sample_train)
#We create the matrix test with the sample test and sample train values
matrix_test = zz_kernel.evaluate(x_vec=sample_test, y_vec=sample_train)
We use the quantum kernel test and training matrices in a classical support vector machine classification algorithm.
#We use a SVC with a precomputed kerner
zzpc_svc = SVC(kernel='precomputed')
#We fit the model with the train matrix and the label train
zzpc_svc.fit(matrix_train, label_train)
#We calculate the score of the model with the matrix test and label test
zzpc_score = zzpc_svc.score(matrix_test, label_test)

#We show the score value
print(f'Precomputed kernel classification test score: {zzpc_score}')
Precomputed kernel classification test score: 0.97
We test the algorithm by seeing how the test set classification does.
#Make a prediction using the test matrix
predictions = zzpc_svc.predict(matrix_test)
As can be seen, out of 300 samples, only 9 were not classified correctly.
#We need to see how many prediction go wrong
for prediction,label in zip(predictions,label_test):
    if(prediction != label): #If the prediction is different from the class
        print(prediction, label)
1.0 0.0
1.0 0.0
1.0 0.0
1.0 0.0
0.0 1.0
0.0 1.0
0.0 1.0
1.0 0.0
0.0 1.0
Validate for the set of 200 images
The same process is repeated but considering that the hold-out validation method was considered valid, the test should be done with different sets at random, which will be carried out with the compressed set of 200 images.
sample_train = [] #List from the sample train
label_train = [] #List from the label train
with open('train_200.csv', newline='') as csvfile: #Open the csv file that we before create
    reader = csv.reader(csvfile, delimiter=',') #Reading the csv file and get the values by commas
    next(reader, None) #We ignore the header
    for row in reader: #We go for each row of the file
        sample_train.append(row[0:-1]) #The values of the samples are all except the last cell
        label_train.append(row[-1]) #The class of that row is the last cell
sample_train = np.array(sample_train).astype(np.float) #Convert the sample train to a numpy float array
label_train = np.array(label_train).astype(np.float) #Convert the label train to a numpy float array

sample_test = [] #List from the sample test
label_test = [] #List from the label test
with open('test_200.csv', newline='') as csvfile: #Open the csv file that we before create
    reader = csv.reader(csvfile, delimiter=',') #Reading the csv file and get the values by commas
    next(reader, None) #We ignore the header
    for row in reader: #We go for each row of the file
        sample_test.append(row[0:-1]) #The values of the samples are all except the last cell
        label_test.append(row[-1]) #The class of that row is the last cell
sample_test = np.array(sample_test).astype(np.float) #Convert the sample test to a numpy float array
label_test = np.array(label_test).astype(np.float) #Convert the label test to a numpy float array

#Show the shape of the arrays
sample_train.shape, label_train.shape, sample_test.shape, label_test.shape
((12665, 16), (12665,), (2115, 16), (2115,))
7 iterations are generated with different images of fixed ranges
score = [] #List to save the scoore of the 7 iterations
for i in range(7):
    train_size = 700 #Number of samples of the training sample

    sample_train_1 = sample_train[i*train_size:(i+1)*train_size] #select the values of the sample train
    label_train_1 = label_train[i*train_size:(i+1)*train_size] #select the values of the label train

    test_size = 300 #Number of samples of the test sample
    sample_test_1 = sample_test[i*test_size:(i+1)*test_size] #select the values of the sample test
    label_test_1 = label_test[i*test_size:(i+1)*test_size] #select the values of the label test

    #map the classical vector to a quantum state with the ZZFeatureMap, 16 qubits, 1 repetiton and a linear entanglement
    zz_map = ZZFeatureMap(feature_dimension=16, reps=1, entanglement='linear', insert_barriers=True)
    #Create the quantum kernel with the ZZFeatureMap
    zz_kernel = QuantumKernel(feature_map=zz_map, quantum_instance=Aer.get_backend('statevector_simulator'))
    #We create the matrix_train with the sample train values
    matrix_train = zz_kernel.evaluate(x_vec=sample_train_1)
    #We create the matrix test with the sample test and sample train values
    matrix_test = zz_kernel.evaluate(x_vec=sample_test_1, y_vec=sample_train_1)

    #We use a SVC with a precomputed kerner
    zzpc_svc = SVC(kernel='precomputed')
    #We fit the model with the train matrix and the label train
    zzpc_svc.fit(matrix_train, label_train_1)
    #We calculate the score of the model with the matrix test and label test
    zzpc_score = zzpc_svc.score(matrix_test, label_test_1)
    #We show the score value
    print(f'Precomputed kernel classification test score: {zzpc_score}')
    score.append(zzpc_score) #Save the actual score
    del matrix_train, matrix_test #Delete the values of the train and test matrix
Precomputed kernel classification test score: 0.97
Precomputed kernel classification test score: 0.9366666666666666
Precomputed kernel classification test score: 0.96
Precomputed kernel classification test score: 0.9633333333333334
Precomputed kernel classification test score: 0.9833333333333333
Precomputed kernel classification test score: 0.9633333333333334
Precomputed kernel classification test score: 0.9466666666666667
The mean value to the set gave it by the autocoder using the hold out 70-30 method is:
#Calculate a mean value of the seven iterations scores
sum(score)/len(score)
0.9604761904761905
Conclusions.
Today’s quantum models are unlikely to outperform the classical model on classical data, especially in today’s classical data sets that may have more than a million data points. However:
1) We can partially resolve the problem for big data sets with certain data reductions that diminish the cost and the qubits.
2) Some data sets are easier to learn for quantum models than for classical models.
In this project, we propose a classification method of 0’s and 1’s through an autoencoder. By this, we could reduce the number of qubits needed to be reproducible in a real quantum computer, getting a cost of 4, and classification performance of 96.04%.
Authors
- Martínez Vázquez María Fernanda linkedin
- Navarro Ambriz Ronaldo
- Martinez Hernandez Luis Eduardo linkedin
- Galindo Reyes Agustin facebookgithub
- Alberto Maldonado Romo
References
[1] Bravo-Prieto, Carlos. (2020). Quantum autoencoders with enhanced data encoding.
[2] Biamonte, Jacob. (2019). Lectures on Quantum Tensor Networks.
[3] Kardashin, Andrey & Uvarov, Aleksey & Biamonte, Jacob. (2021). Quantum Machine Learning Tensor Network States. Frontiers in Physics. 8. 586374. 10.3389/fphy.2020.586374.
[4] Stoudenmire, E. & Schwab, David. (2016). Supervised Learning with Quantum-Inspired Tensor Networks.
[5] Liu, Ding & Yao, Zekun & Zhang, Quan. (2020). Quantum-Classical Machine learning by Hybrid Tensor Networks
[6] Romero, Jonathan & Olson, Jonathan & Aspuru-Guzik, Alán. (2016). Quantum autoencoders for efficient compression of quantum data. Quantum Science and Technology. 2. 10.1088/2058-9565/aa8072.
[7] Foulds, Steph & Kendon, Viv & Spiller, Tim. (2020). The controlled SWAP test for determining quantum entanglement.

